A 'modern 3D API' wrapper for WebGL
This post is a bit of followup to Thoughts about a WebGL Next.
(please excuse the partly broken syntax highlighting in the code samples, seems like github-pages doesn’t know about TypeScript yet)
I did a little TypeScript experiment over the weekend: a wrapper for WebGL which looks more like one of the modern 3D APIs, which I call Altai (as always, coming up with a name almost took longer than writing the damn thing).
It’s not complete, and won’t be for a while, since my ‘precious spare-time focus’ will be on WebGL2 support for Oryol, but it looks already quite promising.
Some obvious questions first:
-
Why a wrapper for WebGL: WebGL and WebGL2 are direct mappings to OpenGL ES2 and ES3. While GLES2 is a simple enough API, recent 3D APIs like Metal show that it is possible to implement a modern 3D-API which is even easier to write code for (yes, even easier than the GLES2/WebGL programming model, unfortunately this ‘ease-of-use’ excludes Vulkan and D3D12). It gets worse with WebGL2/GLES3 where the API shows the same problems as all the desktop OpenGL versions before: new functionality is stacked on top of old stuff without a clear cut between the versions, this is good for writing backward-compatible code that runs both on WebGL and WebGL2, but the result is a much more confusing API, especially for beginners.
-
Why not C/C++ via emscripten: That’s already covered by the Oryol Gfx module. I want/need a small, friendly wrapper API to quickly write minimal reproduction test cases for WebGL bug reports, that was basically the ‘driving problem’ which pushed me from just thinking about such an API to start implementing it. It’s possible to write such test cases in emscripten, but the resulting asm.js blob contains a lot of non-relevant code, and is impossible to step through.
-
Why TypeScript: it fixes most of the quirks of writing non-trivial Javascript manually, transpiles down to readable Javascript, has proper auto-completion and shows errors immediately in TypeScript aware text editors (I used Visual Studio Code).
-
Is performance better than writing WebGL code directly?: Nope, since Altai is just a wrapper around WebGL, it most likely will be (slightly) slower than well-written WebGL code. The Oryol Gfx module compiled down to asm.js or WebAssembly on the other hand will most likely give better performance than hand-written WebGL code.
I think, if and when Altai is finished it will be a nice little lib for hacking simple 3D web demos, and also for teaching and learning realtime 3D rendering.
It will be much smaller than high-level frameworks like three.js (I think the minified, compressed JS will be somewhere around 5 KBytes, definitely not more than 10 KBytes), and the programming model is closer to the native 3D-APIs that will matter in the future, but (at least compared to Vulkan or D3D12) much easier for beginners.
OK, show me the code
There is a main interface Gfx which has all the resource creation and rendering functions. Most creation- and setup-functions take ‘option bag’ arguments, these are similar to the ‘DESC’ structures in D3D or the ‘Descriptor’ objects in Metal, WebGL doesn’t have anything similar (and that’s IMHO one of the reasons why the GL programming model is quite confusing). Most of the option-bag items are initialized to useful defaults, and only options that differ from the defaults must be provided.
For instance to setup the Altai Gfx object with all default settings:
let gfx = new altai.Gfx({});
This initializes a WebGL canvas with default parameters. To override the default parameters, start adding key/value pairs to the option bag:
let gfx = new altai.Gfx({
    Width: 1024,
    Height: 768,
    Canvas: 'my-canvas-id',
    MSAA: true
});
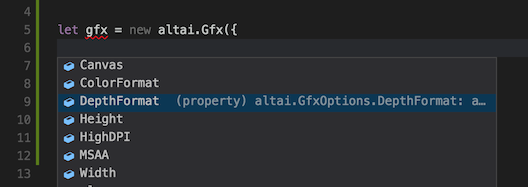
And this is also where TypeScript starts to make sense, since the whole Altai API has been expressed in types, auto-completion allows to peek at the expected types, and it’s impossible to provide the wrong arguments, which is a big plus compared to WebGL’s flat GLenum soup:
Resource Types and Creation
Altai offers the following resource types:
-
Pass: a render-pass object, this contains all framebuffer definitions, and the actions that should happen at the start and end of a render-pass (clearing, MSAA-resolve, etc)
-
Buffer: a buffer for vertex or index data
-
Texture: a 2D- or cubemap-texture which can also be a render-target (WebGL2 would add 3D- and array-textures)
-
Shader: a pair of compiled and linked vertex- and fragment-shaders
-
Pipeline: a pipeline-state-object, bundles one shader, all render state, and the vertex-attribute-bindings
There’s currently no command-buffer resource type, mainly because the Oryol Gfx module also currently doesn’t expose command-lists, it would make sense though in Altai, because it would allow to write rendering commands from WebWorkers and play them back on the browser thread.
In addition, Altai has a DrawState object, which is just a bundle of resource slots:
- 1 slot for a Pipeline object
- multiple slots for Buffers providing vertex data
- 1 slot for a Buffer providing index data
- multiple slots for Texture objects
The Pass and DrawState objects are fully or partly mutable, meaning their content can be changed after they are created (for instance in the Pass object, one can change the ClearColor values after creation, or a DrawState object allows to plug different resource objects into its slots).
All other resource object types are immutable, meaning they cannot be reconfigured after creation (for instance you cannot change the size of a buffer, or the pixel format of a texture, or render states in a Pipeline object). It is possible to update the data content of buffers or textures though.
For Resource Creation the Gfx class offers one creation method per resource type. Resource creation methods take an option-bag object as input, and return a resource object:
    makePass(options: PassOptions): Pass;
    makeBuffer(options: BufferOptions): Buffer;
    makeTexture(options: TextureOptions): Texture;
    makeShader(options: ShaderOptions): Shader;
    makePipeline(options: PipelineOptions): Pipeline;
    makeDrawState(options: DrawStateOptions): DrawState;
The Render Commands
These are the (currently existing) Gfx methods that deal with rendering:
    beginPass(pass: Pass);
    applyViewPort(x: number, y: number, width: number, height: number);
    applyScissorRect(x: number, y: number, width: number, height: number);
    applyDrawState(drawState: DrawState);
    applyUniforms(uniforms: UniformBlock);
    draw(baseElement: number, numElements: number, numInstances: number);
    endPass();
    commitFrame(drawFunc: () => void);
I think it’s quite self-explanatory what those methods are doing, the only thing that might seem a bit strange when coming from traditional 3D APIs is that clearing the color- and depth-buffers happens inside beginPass().
A few things don’t work yet, or are missing: the applyUniforms() method isn’t implemented yet, and I’m not sure if it will look like this. In Oryol I have a shader-code-generator which parses shader code and generates C structures for the uniform data. I don’t have that luxury in Altai, so I need to figure out a simple way to bulk-update shader uniforms.
There are also 2 methods missing to update the content of buffers and textures with dynamic CPU-generated data.
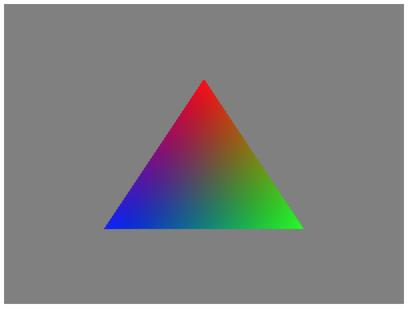
But there’s already enough functionality to render a triangle, let’s see how that works:
Rendering a Triangle in Altai
…first, setup Altai:
let gfx = new altai.Gfx({
    Width: 400,
    Height: 300,
    Canvas: "triangle-canvas"
});
This initializes a WebGL context, binds it to a HTML canvas called ‘triangle-canvas’, and resizes it to 400x300. It also initializes the WebGL context and Altai’s internal state cache to the same default state.
Create a Pass object which renders to the default framebuffer, and clears the background to grey:
let pass = gfx.makePass({
    ColorAttachments: [ { ClearColor: [0.5, 0.5, 0.5, 1.0] } ]
});
The option-bag structure looks a bit messy in this case because of all the nested braces. This is because a full pass description can look quite complex, there may be several color-attachments each with its own parameters (like ClearColor), details may change.
If a black background is fine (which is the default clear color), makePass() can look as simple as this:
let pass = gfx.makePass({});
Next, a vertex buffer with initial vertex data for a colored triangle is created. The data is directly provided in a Float32Array, and the Buffer object will have implicit Immutable usage, since we don’t want to update the vertex data during rendering:
let vertexBuffer = gfx.makeBuffer({
    Type: altai.BufferType.VertexBuffer,
    Data: new Float32Array([
        // positions        colors
        0.0, 0.5, 0.5,      1.0, 0.0, 0.0, 1.0,
        0.5, -0.5, 0.5,     0.0, 1.0, 0.0, 1.0,
        -0.5, -0.5, 0.5,    0.0, 0.0, 1.0, 1.0,
    ]),
});
Next we’ll need a Shader object which will become part of a Pipeline state object. Shaders are separate because the same shader can be used by several pipeline objects:
let shader = gfx.makeShader({
    VertexShader: `
        attribute vec4 position;
        attribute vec4 color;
        varying lowp vec4 vColor;
        void main(void) {
            gl_Position = position;
            vColor = color;
        }`,
    FragmentShader: `
        varying lowp vec4 vColor;
        void main(void) {
            gl_FragColor = vColor;
        }`
});
This will compile and link the vertex- and fragment-shader into a GL program.
…and the Pipeline object, this is the most important resource object. I’m overriding some of the default render state to make it more unlikely that we’ll end up with a black screen. The pipeline object also needs the shader and needs to know how the vertex data is layed out:
let pipeline = gfx.makePipeline({
    VertexLayouts: [{
        Components: [
            [ "position", altai.VertexFormat.Float3 ],
            [ "color", altai.VertexFormat.Float4 ],
        ]
    }],
    Shader: shader,
    DepthCmpFunc: altai.CompareFunc.Always,
    DepthWriteEnabled: false,
    CullFaceEnabled: false,
});
The VertexLayouts block tells the pipeline object that the incoming vertex data is all in one buffer (because there’s only one entry in the VertexLayouts array), and that the buffer has 2 vertex components, one named “position” made of 3 floats, and one named “color” made of 4 floats. The names are used to bind the vertex data to vertex shader inputs.
Again, the VertexLayouts member looks a bit messy because of all the nested braces. This is because there can be several input layouts coming from different Buffers, and each of the input layouts can have instancing enabled individually (which is off by default).
The option-bag interface to create a pipeline object has nearly 50 items for all the granular WebGL render state, but as said before, only the state that differs from the default needs to be provided when creating a pipeline object.
It is important to note that still all state will be modified when a pipeline object is applied (although filtered through a redundant-state cache). This fixes one of the most likely cause of bugs when writing GL/WebGL code where a render state is ‘stuck’ on an old value because it hasn’t been reset to some expected state, messing up rendering in subtle ways.
…and finally a DrawState object is created with the pipeline slot and first vertex buffer slot initialized:
let drawState = gfx.makeDrawState({
    Pipeline: pipeline,
    VertexBuffers: [ vertexBuffer ],
});
And that is everything for setup. The actual per-frame draw-function looks extremely simple in comparison:
function draw() {
    gfx.beginPass(pass);
    gfx.applyDrawState(drawState);
    gfx.draw(0, 3);
    gfx.endPass();
    gfx.commitFrame(draw);
}
This clears the canvas to grey inside the call to beginPass(), applies all the state and data required for rendering inside applyDrawState(), renders one triangle (made of the first 3 vertices in the vertex buffer), calls endPass() to finish rendering to the current framebuffer, and finally calls the commitFrame() method, which takes function object to be called for the next frame (commitFrame() currently only calls requestAnimationFrame() to get a continuous render loop).
And finally, a single call to the per-frame call function is needed to kick-off the render-loop:
draw();
And that is all. The full source code for the triangle can be found here:
To get something on screen, a HTML shell page with a canvas element is also needed, in the simplest case it looks like this:
<html>
<body>
    <canvas id="triangle-canvas" />
    <script src="triangle.js"></script>
</body>
</html>
And the result (sorry, just a screenshot for now):